Thursday, July 9, 2015

Starting a New Trend

I think for the first time ever, I'm on the front edge of a trend!  In fact, I'm starting this trend! Watch out...you may be next! 

Do you jump on the latest & greatest band wagon right away?  Or do you sit back and see how it plays out?  Really, this is one your going to want to jump on!?

All kidding aside, here is a little project I did just for me!  It isn't something we do very often or often enough.  

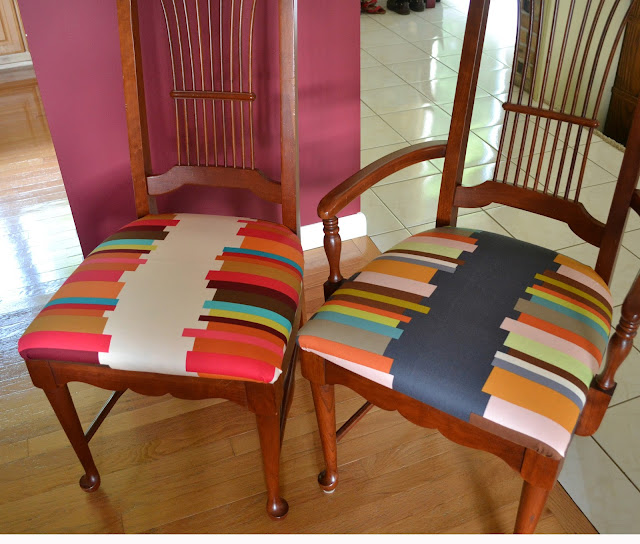
In a previous post, My Thread Is A Staple, I showed you the transformation of my dining room chairs after I reupholstered them with Anna Maria Horner home dec fabric.  I was lucky enough to have almost a quarter of a yard left.  I could have put it away, but me being me, I had to think of something to make with it.  What do you think?  


Cross Body Bag
10" H x 9" W

My chairs look great, why not make a bag?!  The trend I am starting:  match your bag to your chairs!  Who does that?  Can't think of anyone can you?  Which makes me a trendsetter!

The last one I made was nearly a year ago and it was getting sad looking.  Large purses are not me.  I need a small, compact, a couple spots for keys, phone and lip balm and it must have a strap long enough to go across my body.  

I had to cut and piece together the fabric.  Very simple job since the stack of the colors are wonky anyway.  Plus I added fusible fleece because I like a little cushion and it looks better after quilting.  Luckily it was just enough to cut off a basic pocket for the inside.  This one needed to be a little bigger than the last one, so far all the stars are lining up!


The pocket is sewn on to the lining which has a light interfacing.  It has three pockets for the three most important things I carry!  Boom done, easy peasy, simple simon!

I do not make bags often.  I can count on one hand how many (not including zipper pouches).  They freak me out!!

For the inside I went with Kona Wasabi.  Wasabi, Wasabi, Wasabi!!!  I love that color, perhaps my favorite ever!


I didn't do a lot of quilting on this.  I quilted organic straight lines, changing the thread color a few times for a little drama.  Stitched up the sides, boxed the corners and then had to remember what to do next!  I  forgot!  


Putting it together is so easy (once I remembered).  Just like a fabric basket.  Right sides together, add the strap between the outside and the lining, pin, sew around the top, leave an opening in the lining for turning, and it was done!  


It looks huge in this picture!  It isn't really.  A mere 10" H x 9" W.  I like my bags (by that I mean purse) long, I like them to smack me on the butt when I'm walking...not really smack me, sway with me!


And for Leanne at She Can Quilt, the chair and bag!  Because you know you want to follow this trend!  

I almost made a tutorial, but think this is such a basic, simple design that many could whip it up just by looking at it!  Plus, have you seen how many cool bag patterns there are out there?!

Do you love to make bags?  What is your best advice for those of us who are intimidated by the thought of making one?

LINKING:

Wednesday, July 8, 2015

Challenges Are Not Me!

If you are a member of the Modern Guild (or not), you may know about the Riley Blake Fabric Challenge.  You sign up for a little bundle of fabric from a specific line (The Cottage Garden) and make something. 

The rules are make something quilted, something you have never done before and only use Riley Blake 'The Cottage Garden' Collection.  You can buy more fabric from this line, what ever you need above and beyond the free bundle.  

This was the bundle that was mailed out to members.  I did buy one additional fabric.  A 1/2 yard of the grey solid.  Just in case, I figured it was grey and I can always use that color!


Where will I go with this?  Heck if I know!  I wasn't sure what I was going to do at all.  I knew that I was only going to allow myself to use the free bundle and the half yard of grey. Nothing more.  That means I followed the rules...something new.  (yes, I am pushing it)

And, I knew I wanted to paper piece something (not new).  Only this time I would combine different patterns and twist, cut and twiddle with it.  (new)  

The pattern above is 'Rockstar' from Diane Bohn:  From Blank Pages blog.  I love the shapes, but they were going to change.  


The birds are a big draw!  You gotta use the birds!  Fussy cutting (something new) and the first time I pieced this Mini Trajectory block which I found on Craftsy.  (new).  

Now to figure out how to make them go together.  After turning, twisting and eventually cutting, I came up with this design.


I had to sew partial seams which just about killed me!  I don't think my calculating was correct, but it eventually came together.  


See how wonky they turned out?  It happens. I kept thinking that some good old quilting will take care of the issues!


Sewn together in one lovely large block.  I have to admit that by this time I was hating it. What was I thinking?  I'm not sure, but I knew this 'thing' was not going to see the light of day, let alone be entered in the challenge!

But I forced myself to keep going.  I added the left over pieces from the 'Rock Star' blocks around the center.  Then grabbed the rotary cutter and sliced an improv border with flower print.  Done.  I have never combined the precise method of paper piecing with improv...New! 

16" x 16"
Pillow Cover
I used my very limited free motion quilting skills to finish it off.  Go for it!  Quilt the hell out of it, it will be fine...  


In all honesty, I threw up my hands in frustration by now!  Just quilt it, wash it and chalk it up to a lesson learned!


Last, the backing.  The remaining three pieces of fabric were combined with a hidden zipper for this crazy pieced backing.   After that, not one little piece of fabric was left over.  Not one!!

After washing, after the crinkle action happened, I then felt much better about this pillow. I'm not saying I love it.  I'm saying I don't hate it any longer!  

I kind of feel bad that my attempt at this challenge didn't work out so well.  I'm sure there were plenty of people who wished they had been able to get one of these bundles when the challenge was first announced.  And I'm sure they would have made some thing fantastic. 

I now know that if you aren't in love...love...love with a fabric line or color combination, there is no way you can make something that you love.  I'm proud that I finished and happy that I did complete the challenge.

Did you take the Riley Blake Challenge?  Did you have difficult time with it?


LINKING:

Friday, July 3, 2015

Compass Rose

I went to bed last night so frustrated with the pictures I had taken of this quilt.  It can be a struggle getting 'the perfect shot' or even true colors.  After my first or cup of coffee this morning, I was determined to try again and let's just say they are better!

I didn't have to think real hard on what to name this quilt.  The further along I got, the more that was added, it was pretty evident.

A Compass Rose is that figure you see on a compass, map or nautical charts.  It can be very basic or rather ornate.  It gives you North, South, East and West along with the intermediate points. 


I had a totally different plan when I started this quilt, somehow I veered off course (I could have used that compass), went in circles a few times and eventually found my bearings.  

It all started when I wanted to use hand dyed scraps...

Geometric Quilt
Compass Rose
46" x 64"
I was playing around with my scraps, thinking I would love to try some paper pieced triangles. Those would look good and be fun!  I opened up my EQ7 Program and searched until I found what I was looking for, did a few modifications to the size and printed them out.

There needed to be a focal point.  With little idea of what that would be, I eventually came across this star in EQ7.  Can I find it again?  Heck no!  I wasn't designing a pattern, this was all going to be done on the fly!  One piece at a time and when that was finished, I would look for something else.  


I enjoyed making this star until the center.  There were no directions, no tutorial and no turning back. I winged it and after a lot of tweaking...it came together for the most part.

The first round of geese went together quickly.  Paper piecing and points go together like peas in a pod!


From here, I kept building around and around.  Jump on EQ7, check out Pinterest or scan Instagram.  Once I saw something I liked, I figured out how I was going to use that element and found a pattern or made one.  

After each triangle/geese pieces were finished, I had to calculate the corner squares or spacing pieces from the back ground.  It was time consuming.  But when you are working with out a pattern it's to be expected.  By the way, the gray is Kona Steel.  


Point after point, they were all coming together.  I knew each round needed to stay as centered as possible.  I carefully marked and pinned (which I don't always do) hoping to keep it all on course!


Made it!  To the end.  

This would bring us to the next phase.  Pinning and quilting.  We can take a brief intermission...

Okay, ready. 


There is the usual 'hemming and hawing' about how to quilt it.  This lasted a few weeks.  I really didn't want to think about it.  I knew it needed something to tie in the compass theme, other than that, I had nothing.

When all else fails, grab the Hera Marker, ruler and figure it out as you go.  After all, that does seem like the theme of this quilt from the very start.


The quilting is all straight lines.  I would pick a point and work it around to the start. Pick another point or even the same starting point, and continue on.  Then I would quilt a few rounds and mark some more.  It became very confusing after a while!  There are some areas that are dense with quilting and some not so much.  


I really love this part!  Super dense quilting at the point and lines that radiate outwards.


Once I thought it was finished, I went back and added some more!  Maybe I was addicted, maybe I'm crazy...I couldn't help myself!  


The backing is Kona Coral and made for a great burst of color.


In the end, there were many things I would do differently with this quilt.  If I were to plan it out, yes, it would be changes.  Because it was a 'figure it out as you go', no pre-planning, I'm very pleased with it!

Are you a planner?  Do all your ducks need to be in a row before starting a project?  

LINKING:

Tuesday, June 30, 2015

My Thread Is A Staple

It is finally time to reupholster those hideous dining room chairs!  I changed them about 10 years ago, and since then my taste has drastically changed (for the better I think).  I've put it off for long enough, so today my thread is a staple!


When I first got my dining set, this was the fabric that was on the cushion.  I have nothing against floral, but this certainly wasn't my taste even ten years ago.


One day, back in the day, I went to JoAnn's an perused the Home Dec fabrics.  Very different than the original, and very safe but much better than before!  

As you can see over the years the fabric wore out and ripped.  We eat dinner at the table 90% of the time.  Even though the table has become my 'studio' and my machine is firmly set up 100% of the time, we still use it for nearly every meal.  It can be a pain in the butt, and I don't much like having to clean up my space...since I took it over, I guess it's the least I can do!


The first step was to take the worn and ripped layer off.  The hardest part was carefully taking out the staples.  I used a screw driver and pliers to pop them out, but all the while I was being so careful!  Last thing I needed was another accident!


What did I settle on for the new fabric?  A couple months ago my daughter Britt and I went through her fabrics.  I think she had an entire tote full of Home Dec fabrics, most of which she gave to me. Among her stash were 2 pieces of Anna Maria Horner Drawing Room. 


There was just enough of the top color to finish the four side chairs and the bottom color would work for the two end chairs.  


I stretched, pulled, folded and stapled.  Over and over and over again.  The back ended up looking like a hot mess, but really who will see that?!


With the first one under my belt, I was on a roll.  Five more to go...

home dec fabric
Modern fabric on not so modern chairs?!  Let's just call it eclectic!


Keeping it centered was my main goal.  


I think they turned out pretty good!


By the end of the day each chair had a miraculous makeover.  It was easier to put off for months (years) instead of dealing with it, a lesson I learn over and over again.

I will say between removing the staples and using the staple gun was hard work!  My hands and wrists were feeling it by chair number four!  

I'll take thread over staples any day!  It sure was a nice change and something completely different to do.

Have you ever reupholstered anything?  Do you like it?  I'm sticking to once every ten years and only chair cushions!

LINKING: