Friday, July 27, 2018

Filling Time With Mini Mini's

I love a good challenge and what better way to challenge yourself than making some mini mini quilts?!  Sometimes after making a quilt or a block that I love, I'll see if I can take it a step further and try it on a small scale.  It usually happens when I'm paper piecing because there is always a template involved and it's easily reduced to whatever size my little heart desires!

In my last post I took you into the world of Mondrian art.  There seemed to be a lot of interest in making the blocks into a paper pieced pattern and I'm happy to say that that is happening!  Lift your jaw off the floor...I'm actually doing it!  I'm just about finished, but with all my patterns I seem to obsess over every detail.  I have a couple volunteers who will be testing my pattern before it hits the Internet, so let's give it another week before it is finished.

ALL that being said...I decided to take the blocks, reduce the pattern to 4" and see what would happen!


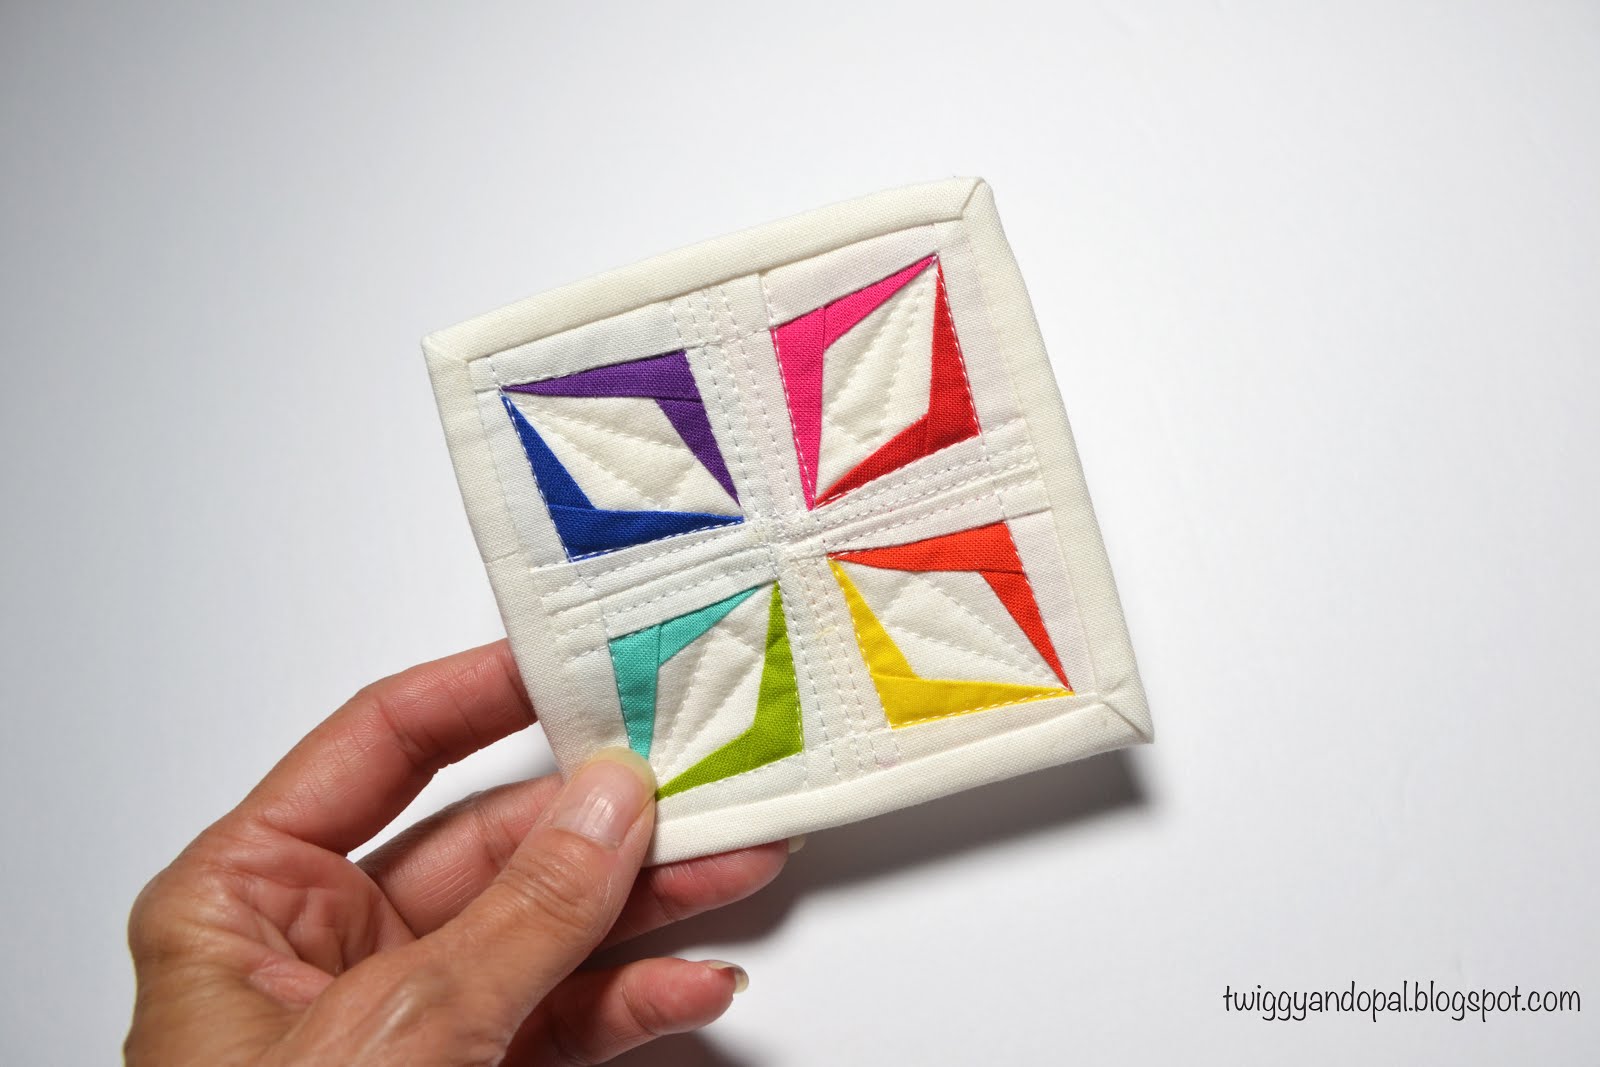
MONDRIAN MINI'S
4" X 4"
They look exactly like the 9" blocks, but much smaller.  I threw in a few 'tools' for perspective and will state again...these are 4" x 4".  Seems like the perfect size for coasters to me!


Perhaps the hand model shot conveys it better!  I'm thinking of adding the 4" paper pieced template as a bonus in the completed pattern.  In case anyone wants to give it a try.


The quilting is very simple.  I thought because of the geometric nature and size, it was appropriate.


I rarely have little 'trinkets' on had that go with any given project for the sake of a photo, but when I saw the chicken I couldn't resist a lighthearted shot!  


The day I made these I had just finished up the last flower bed/bark dust project and was feeling the effects of hoisting bag after bag.  But when there is time before having to make dinner and no other plans...one sometimes quilts a little something!

The other mini's I made came after I had finished my paper pieced Kite quilt.  Reduce, reduce, reduce!!


MINI KITES
4 1/4" & 3 3/4"
 
The paper pieced pattern is quite simple, so I knew it would make for a semi easy piecing session.  (even at 4 1/4" and 3 3/4" finished!)  They might look familiar if you are on instagram or if you are a member of The MQG you may have seen them in the July News & Happenings newsletter.  


I really have a hard time trying to resist making anything into a rainbow.  These seemed like another opportunity to go small and gloss it up with color!

This photo is in the binding stage.  I always use a 1 1/4" wide strip and sew it on as if it's a double folded binding.  After which I'll flip it over, fold the raw edge over about 1/4" press and finish by hand stitching it to the back.  


Cute as a bugs ear I think!  


I've been working on so many quilts and ideas lately, this was a nice post diversion!  I have a custom quilt with...you guessed it...a rainbow theme!  It also includes a super sized block and low volume improv.  I'm excited to make progress on that!

I also have that pattern...

And I have an amazing two color quilt that I am so excited to see if I can make for QuiltCon.  The colors nearly slap me in the face every time I look at the drawing...kind of interesting.  I can't really say more than that at this time!

Oh, and I just finished zig zag stitching (applique) lots of leafs on a quilt I inherited from my daughter.  She started it years and years ago.  This year...I plan on finishing it!

Stay safe, stay tuned and seriously...this girl needs a beer!  Wink!


LINKING:

Sunday, July 22, 2018

Mondrian Part II

I have been fascinated with Piet Mondrian art for a long time and tried my hand at designing a quilt, or more specifically a pot holder set, using the basic shapes and colors his art is known for.  

I gave a shot at it back in April: Mondrian :: Colorful & Simple , and was pleased with how they turned out.  I went into it with little idea of what to do and how to do it.  It resulted in many moments of scratching my head and figuring out the puzzle.  I vowed then and there that one day I was going to design a block where I could have some sort of consistency and not have to wonder what my next step was.
9" POT HOLDERS
And I did just that!!  I enjoyed the design part so much that I ended up designing two different Mondrian inspired blocks. 


One thing I love about the new EQ8 program is the color.  You can choose to print in color or not and in this case I thought it would be best.  I also like to know what size pieces I need and cut them before I paper piece certain projects.  Since these were rectangle and squares, I was able to calculate my pieces and for future use, I wrote the sizes on extra copies I made of the block pieces.


The pieces went together pretty seamlessly and quickly.  The pieces for each block are a decent size so there wasn't any tedious, fussy work in assembly.  


I ended up making two of each block because...well, pot holders do come in sets!  The blocks I made are 9" square which are a good size for me.  


My two sets!  I still have the binding to sew to the back on one set, but I'm pretty dang happy with the results.  Now I can fly through future blocks without losing too many brain cells!


I had planned on have each pot holder in the set to be the same.  However in my excitement of it all I accidentally sewed one piece wrong on one in the second set!  Plan B was to go with it and mix and match!  

A couple things I learned about this design.  You can mix and match for sets.  You can also flip the pieces around in any given set for even more variety.  And, if you choose to do so, you can decide which section you want the colors to be placed. 


9" POT HOLDERS
HOT & COLD
I had no intention of making a third set after finishing the first two.  None at all.  The next morning I woke up with an idea and you know how that goes!  I had to do it!  When I think of Mondrian I immediately think of red, blue and yellow.  But it doesn't have to be does it?  No it does not!  My idea was to make one with warm colors and one with cool colors.  Hot & Cold!  That's it...my big idea that popped into my head!

It's fun designing blocks that you know you'll use again.  I'm pretty sure there will be several variations over the next few months!

I'm thinking they might make a great pattern at some point.  I talk about designing patterns all the time but never seem to quite get there.  It is definitely a lack of confidence!  I probably could handle a pattern like this though!  
LINKING:


Wednesday, July 18, 2018

One More Weave :: Small Scale

After trying my first weaving project (Fabric Weaving) I was pretty much hooked!  Not in an obsessive way, more in a curious way.  I'm excited to try new ideas and see what I can come up with.  

With my first project under my belt, and the desire to use as much of my 'undesirable' stash as I could, I had some scraps that needed to go away.  But go away in a good way!  So I thought I'd put them to good use in a small wall hanging using 1/4" bias strips.  


MINI WEAVE WALL HANGING
11 1/4" x 11 1/4"
Sometimes a simple thank you isn't enough when someone goes out of their way to do something nice for you.  This quilt will be sent off to its new home and I hope that it will surprise and delight the new owner.  The only thing better than surprising someone is being the one who is surprise...don't you think?!


To make the 1/4" strips I started with 1/2" strips and ran them through my bias maker tool.  I can't imagine making so many strips without that tool!  I'm sure I would never have tried weaving if I didn't have it!


This is only my second time weaving, but there are a couple things that I've learned along the way.  Since I have only tried using prints, I've learned that you need to group more rows of the same fabric together in order to see a distinctive pattern.  And have them go vertical and horizontal.  Darker fabrics will obviously stand out more.

Another issue I came across, and this might be more for humid parts of the country, after making the bias strips I found if you let them sit around for a couple days they start to loose the crispness of the press.  I had to run the iron over many of the strips before I could weave them through.  

The good news is I learned a way to prevent that.  After I had a layer of strips ironed, I would lay them on a board and then place another board over them and repeat. And to make sure they stayed crisp I added a little weight to the top.  I used foam board and heavy cardboard for mine.  Whenever I was ready to weave, they would be ready to go!


I don't really think something this small needs to be quilted, but quilt it I did!  I think I mainly did it so that there was texture and a design on the back.  That's kind of weird when I think about it!  Simple straight lines was the answer...again!


A combination of Aurifil pink, yellow and orange thread was randomly used.  As you can see, the lines created a grid and with that...texture!

Finishing it off with a pretty pink binding, my second woven project was in the bag!  I can't wait for wefty weave #3!  I really want to try it with solids, but I'm trying to use my print stash...what's a girl to do?!

Have I nudged you even closer to trying the Wefty Needle for weaving yet?  Maybe my next project will tip the tables for you!


LINKING:


Sunday, July 15, 2018

One Year Later :: My Therapy Quilt

When I started this quilt I had no idea where it was going.  I was in need of a project to do by hand that would occupy my mind, heart and hands nearly one year ago.  Unbeknownst to me when I started, but this quilt has taken me on journey.  I went from deep sadness and heartache to happiness.  I won't say there isn't still that sadness, but not to the degree that was there in the beginning.  Losing my brother and my four legged best friend at the same time was devastating.  They say it gets easier and it does.  We never forget, we always have our moments, but we continue to take one step at a time until things get better.  

Since this quilt has become more of a celebration quilt, lets just get to it and revel in the joy of it all!

I sound like this is a finished quilt!  It is not!  I have a top, a flimsy...the finish won't happen for a couple months yet!


Much like my last quilt, this one kept growing.  In fact I think it is too big!  Last time I shared my progress I was wondering how I would deal with the edges.  As you can see I added more black triangles.  As for the top and bottom, well I ended up adding an extra row so that I could trim it to have full black stars.

After today there will only be one more post about this monster!  You can check out my adventures with diamonds in these posts:  

August 2017:  Star Light, Star Bright
October 2017:  Diamond Hexie Stars
November 2017:  Diamond Hexie Stars 2
December 2017:  The Real Work Begins
April 2018:  Hexie Diamond Update


I was left with a big pile of templates, yet it doesn't reflect the actual number of triangles and diamonds in this quilt.  I would make my hexies stars and take out the center templates so I could reuse them for the next batch of stars.  After a while some get pretty messed up.  I would print off sheets of them on an as needed basis. 

The template/triangle/diamond reality is this:
78 - Hexie Blocks 
936 - Diamonds
199 - Triangles

Now that's a lot!!


I've been calling this quilt 'Michaels Garden' after my brother.  The gray star represents him...front and center, loud and clear!

All the fabric is Kaffe Fasset, the black is Kona Pepper and the gray is Kona Steel.  The bright solid diamonds are a combination of everything...whatever was on hand and I could get six diamonds from it was fair game!


I cannot believe I actually hand stitched this entire quilt!  One thought that crossed my mind, besides me thinking I had lost my mind, was back in the day that was how things were done!  Imagine having to cut each piece of fabric,  hand stitching the pieces together, and then finishing it off with hand quilting.  I think my current productivity would be cut by 90%!!


Not every point is lined up perfectly perfect.  Then again perfection is in the eye of the beholder.  It doesn't bother me, not even in the slightest!


I had fun cutting out prints for each star!  At first I had to have three exact matching diamond groups, later on when my supply was dwindling, I ended up being much more flexible.


The back is a mine field of seams, dog ears and threads!  I used glue to hold and fold the fabric around the templates, which meant that some of the fabric was hard to pry loose!  There's a lot of fabric threads that ... don't judge ... I don't care about and I'm going to leave as is.  Seriously, there are hundreds, thousands or more!  Plus, I'm keeping the quilt for myself and picked Kona Pepper for the backing for added camouflage!


It was bitter sweet when I finished the last stitch.  This quilt became a part of my nightly routine for so many months and frankly, I wasn't ready for it to end!  It was time though and I can always start another EPP project!

This quilt will end up being about 60" x 90" and weighs a ton!  I first thought I'd quilt it myself, but I came to my senses pretty quickly!  How could I spend all that time hand stitching every piece and then mess it up with basic quilting?!  I could not!  A member of our guild will take on the challenge and work her magic!  September will be the magic month for a real, total and complete finish!

Would you take on the challenge of making an entirely hand stitched quilt?  I might again...one day!

LINKING:


Wednesday, July 11, 2018

It Wouldn't Stop Growing!

How often have you started making a small quilt and the next thing you know...it grew into something much bigger than expected?  Because of the way I work, usually with no or little plan, it happens quite often to me.  


When I started this quilt I was determined to use the fabrics I picked in the May Blogger Bundle I curated for  Needle & Foot Fine Fabrics.  You can read my post about the bundle and the start of this quilt here:  Blogger Bundle


The bundle is still available in Bernie's Etsy shop, you can find it right here:  May Blogger Bundle

I began paper piecing the 4" kite blocks with the idea that I'd make a simple, small table runner.  It would be the perfect size to showcase the fabric and be a relatively quick project to complete in a timely manner.  

The paper pieced block is by Flying Parrot Quilts and is free when you sign up for her newsletter.  It's one of those blocks that I've wanted to play with for a long time and this was finally the time to do it!


My first batch of blocks gave me a good start, but I soon discovered I needed more.  I would layout my blocks and decide I had to have more in order to distribute the prints around, and even then I couldn't decide on a layout.


Eventually all of the blogger bundle fabric was used and I was left with a feeling that there still wasn't enough.  This was a 'put on your thinking cap' moment for me!  In the end I went through my stash and picked fabrics that would compliment the original fat quarters.  

It still didn't mean I had a layout in mind though!  In time that idea finally came and the rest fell into place.


46" x 61"
I decided to keep the prints together in threes and add a plain square.  The background is Kona Snow which lets each print standout.  It took a while to get just the right layout!  Once all the blocks of four were pieced, I figured it was the best time to tear out the paper. 


After careful thought I choose Kona Black for the inside 1 1/2" border (finished) and a 3" outside border (finished).  With the three blocks that stood out the most, black, it seemed like the best idea.  Plus, I could then use black for the binding.


Believe it or not, I kept the quilting pretty simple!  The center of each block looks so poofy!  I didn't do any quilting in the black border at all.  But I did quilt some groovy diamonds in the outside border.  They look a lot like the kites!


One other detail about the quilting...I decided to use a heavier thread.  I had a spool of Aurifil 30wt in an off-white.  I like to add the color name and number of the thread I use, but this thread was unnamed!  But the number is 6722!


Again with the pieced back!  I didn't have a big piece of anything that would go with this quilt!  So I grabbed my left over Kona Snow, a piece of Kona Bone and lastly Kona Ivory.  And with all my little bits and pieces I made four slabs and gave them the wonky block effect for the finishing touch!


The funny thing is I originally was aiming for a runner, which led me to think I'd instead make a baby quilt.  By the end of it all it grew to a good sized throw quilt!  Welcome to my wacky world!


The May Blogger Bundle was inspired by Spring.  The start of sprouts, flowers and weeds!  By the time I finished it became Summer with oppressive heat and humidity!  Its amazing how just  a couple of months can change so drastically!


LINKING:


Wednesday, July 4, 2018

Fabric Weaving :: And I Like It!

I don't know about you, but when I finally get to try something that I've wanted to try for a long time I can't help but get excited!  It's a treat to have the time to explore and give it a go, but it's even better when it's finished and you love it so much that you practically drool on it!

Fabric weaving is something that I have wanted to try for a couple years now.  A couple inspiring weavers are Mister Domestic or t_Jaye on Instagram.  Their projects sparked an interest in me without a doubt!  I've fiddled with weaving my tiny raw edge scraps, but it wasn't actually real fabric weaving.  The Christmas before last I was gifted a set of Wefty Needles and the hope that one day I could and would actually use them.


Fair Warning...this is a long post and there are a lot of pictures!


WOVEN RUG
20" x 31 1/2"
While I patiently waited for the time to weave, I also thought about what I would weave.  Maybe a small pillow, or a mini square.  Something small to start out with.  Somewhere along the way I started getting really sick and tired of looking at my print fabric stash.  Some of the fabric I bought years and years ago, and frankly looking at it sit there year after year began to wear on me.  I tried to come up with projects where I could use some, but it never seemed to make a difference.

Finally...finally, I had a light bulb moment!  Weave + Undesirable Prints = A Win!  With an idea, time and fabric I quickly began on my mission.


WEFTY NEEDLE
This is the tool of the trade!  The needles are a sturdy hard plastic that are just over 5" long.  They come in a set of two, one for 1/2" strips and one for 1" strips.  They can be purchase on Etsy here:  WEFTY Needle.

When you weave you have to pin your strips to hold them in place.  Fortunately I had a old board that would work perfectly for whatever size I was going to make.  One of the most important parts of weaving is keeping your strips and rows straight.  It's recommended to draw a grid on a foam board, which I did.  If it wasn't for YouTube...I would be lost with weaving!  (Wefty Needle  on YouTube)


I drew a 1" grid across the entire board in pen!  Whatever size you decide to make (1/2" or 1") your strips, this grid size will work.  I decided at the beginning that I was going to make my strips 1/2" wide.


I rummaged through my fabric picking mostly pink, yellow and lime greens.  My goal was to use the larger pieces for the long vertical strips and smaller pieces for horizontal strips.  I estimated how many strips I'd need to cover the board and went to town!  My first time weaving and I decide to go big or go home!

For 1/2" strips to weave, I needed to cut my strips 1" wide.  Before I cut anything, I used starch on every piece of fabric.  That way I knew it wouldn't get wonky and it would also give me a good clean fold.

I ended up using 46 long strips that were approximately 34" long and 62 short strips that were 21 1/2" long.

By the way, if I had fabric I wanted to use but it wasn't long enough...it wasn't a question that I was going to sew two pieces together to make it work.  This was just a practice piece!  If you do that, I suggest sewing it on the bias (like making binding) because it'll make it easier to pull through the bias tape maker and it'll lay flat.


CLOVER Bias Tape Maker
Besides your Wefty needle and grid foam board, a bias tape maker is also a must!  You could hand fold your fabric but the bias tape tool saves a lot of time.  I have several different sizes that I've used over the years. 


Have any of you seen the newest craze 'Jelly Roll Rugs'?  They're all over instagram and one of my guild members was making one at our retreat.  They are pretty and it's interesting, just not for me.  It got me thinking...again!

What if I were to weave a rug?  During my loosely planned introduction into weaving, I was sure that all my prints were going to be awful in the end.  So a not pretty rug would be a perfect place to plant my dirty feet!  It was an option just in case!

I started my pinning my vertical strips on the top and bottom.  As I went along, I made sure to line up the strips using the lines on the grid.  Piece of cake!  Next up was to find the center and start weaving the horizontal strips.  I had all my strips laid out where I could grab and go.  So far so good!


As progress was being made I could see the beginnings of a pattern.  I was starting to get excited!  I also noticed that my strips were starting to land over the lines, meaning I wasn't making sure they were tight enough.  A few row adjustments and all was good and I was back on track..


It helped that I went with the most basic weaving design too!  Over one, under one, over one, under one and repeat!  I spent part of a day working on the weaving and finished it up the next day.  

It isn't really hard.  Stay focused on keeping the strips straight.  Your fingers might get a little sore tightening up the strips.  Have lots of pins on hand.  And sit somewhere that you are comfortable!  I'm going to estimate that from the time I started to the time I finished weaving, it probably took me 6 hours.  Don't hold me to that though!  I'm guessing!


I had no idea what I was getting into with this!  But I liked it!  Not as a full time thing, just as a scrap buster and nice change of pace!

After the weaving was finished I used masking tape around all four edges.  I was freaking out a little bit!  What if I pull the pins and the whole thing falls apart of shrinks up?  


One step I forgot to mention, and a step I was so glad to learn about, interfacing!  Before any weaving began, I took a large piece of lightweight fusible interfacing and pinned it on the grid board with the fusible part facing up.  That way I could fuse it to the backside of the weave.  I was still able to easily see the grid lines through the interfacing.

Before pulling the pins out, I took the entire board to the ironing board and started pressing (no steam) over the entire board.  Once I was sure the majority of it was adhered to the back, I took all the pins out.  And you know what?  It didn't fall apart nor did it spring back like a rubber band!

Another trip to the ironing board for one final adhesive adhering...and I was good to go!  The weight of the weaving surprised me.  Very substantial, but really not any heavier than some improv quilts I've made!  


I didn't want to trim the edges until I stitched around the entire piece.  Fortifying the edges and making darn sure the strips wouldn't wiggle or fall out!

I knew when I started this that my husband would think I was crazy.  Midway through the weaving was the first mention to me about it.  'Now what are you doing' he asks.  'Just weaving' I say.  

It wasn't until it was off the grid board that he understood what was happening, and began to get excited about it!  When I told him I was going to make it into a rug, he thought I had totally lost my mind!  He thinks walking on it is a dumb idea and that it should be a wall hanging!  We went back and forth about it!  I'm pretty sure I won the debate!


The back is a polka dot Home Dec fabric that has also been in my stash for ever!  I was so glad to have finally used that!

If this was going to be a wall hanging I'm certain I wouldn't have quilted it!  But like I said, I have 'it's going to be a rug' in my head, and what if my feet are really dirty and it needs to be washed?  Hopefully the quilting will hold the strips in place and prevent any fraying if it does make it into the wash.  Time will tell!


That's a lot of prints!  I finished it off with a dark pink binding.  I wanted to put a wide 2" binding on it so bad, but my track record with 2" binding isn't all that great!  It would have been pretty great though!


Are you wondering where this rug will end up?  The kitchen, the front door...the bathroom?  All three of those would be wrong and too messy and dirty for this rug!


I believe it's new home will be under my sewing table!  It's kind of perfect!  Foot pedal, feet, pretty!   


With it being under my table I won't be walking on it.  If it were in a foot traffic area the possibility of it slipping or sliding out from under you is real!  It could most definitely be a danger!  A rug gripper would be put underneath to prevent any accidents from happening.


Have you tried weaving before?  Should it be a rug or wall hanging?  I'm still debating that issue but don't tell my husband!

This was a very long post!  I was excited about weaving and super excited to use my 'undesirable' fabrics!  More plans are in the works, with more scraps and maybe a different weave design.  


LINKING: