
Happily they all came together! Improv curves right down to the pieced bindings!


 |
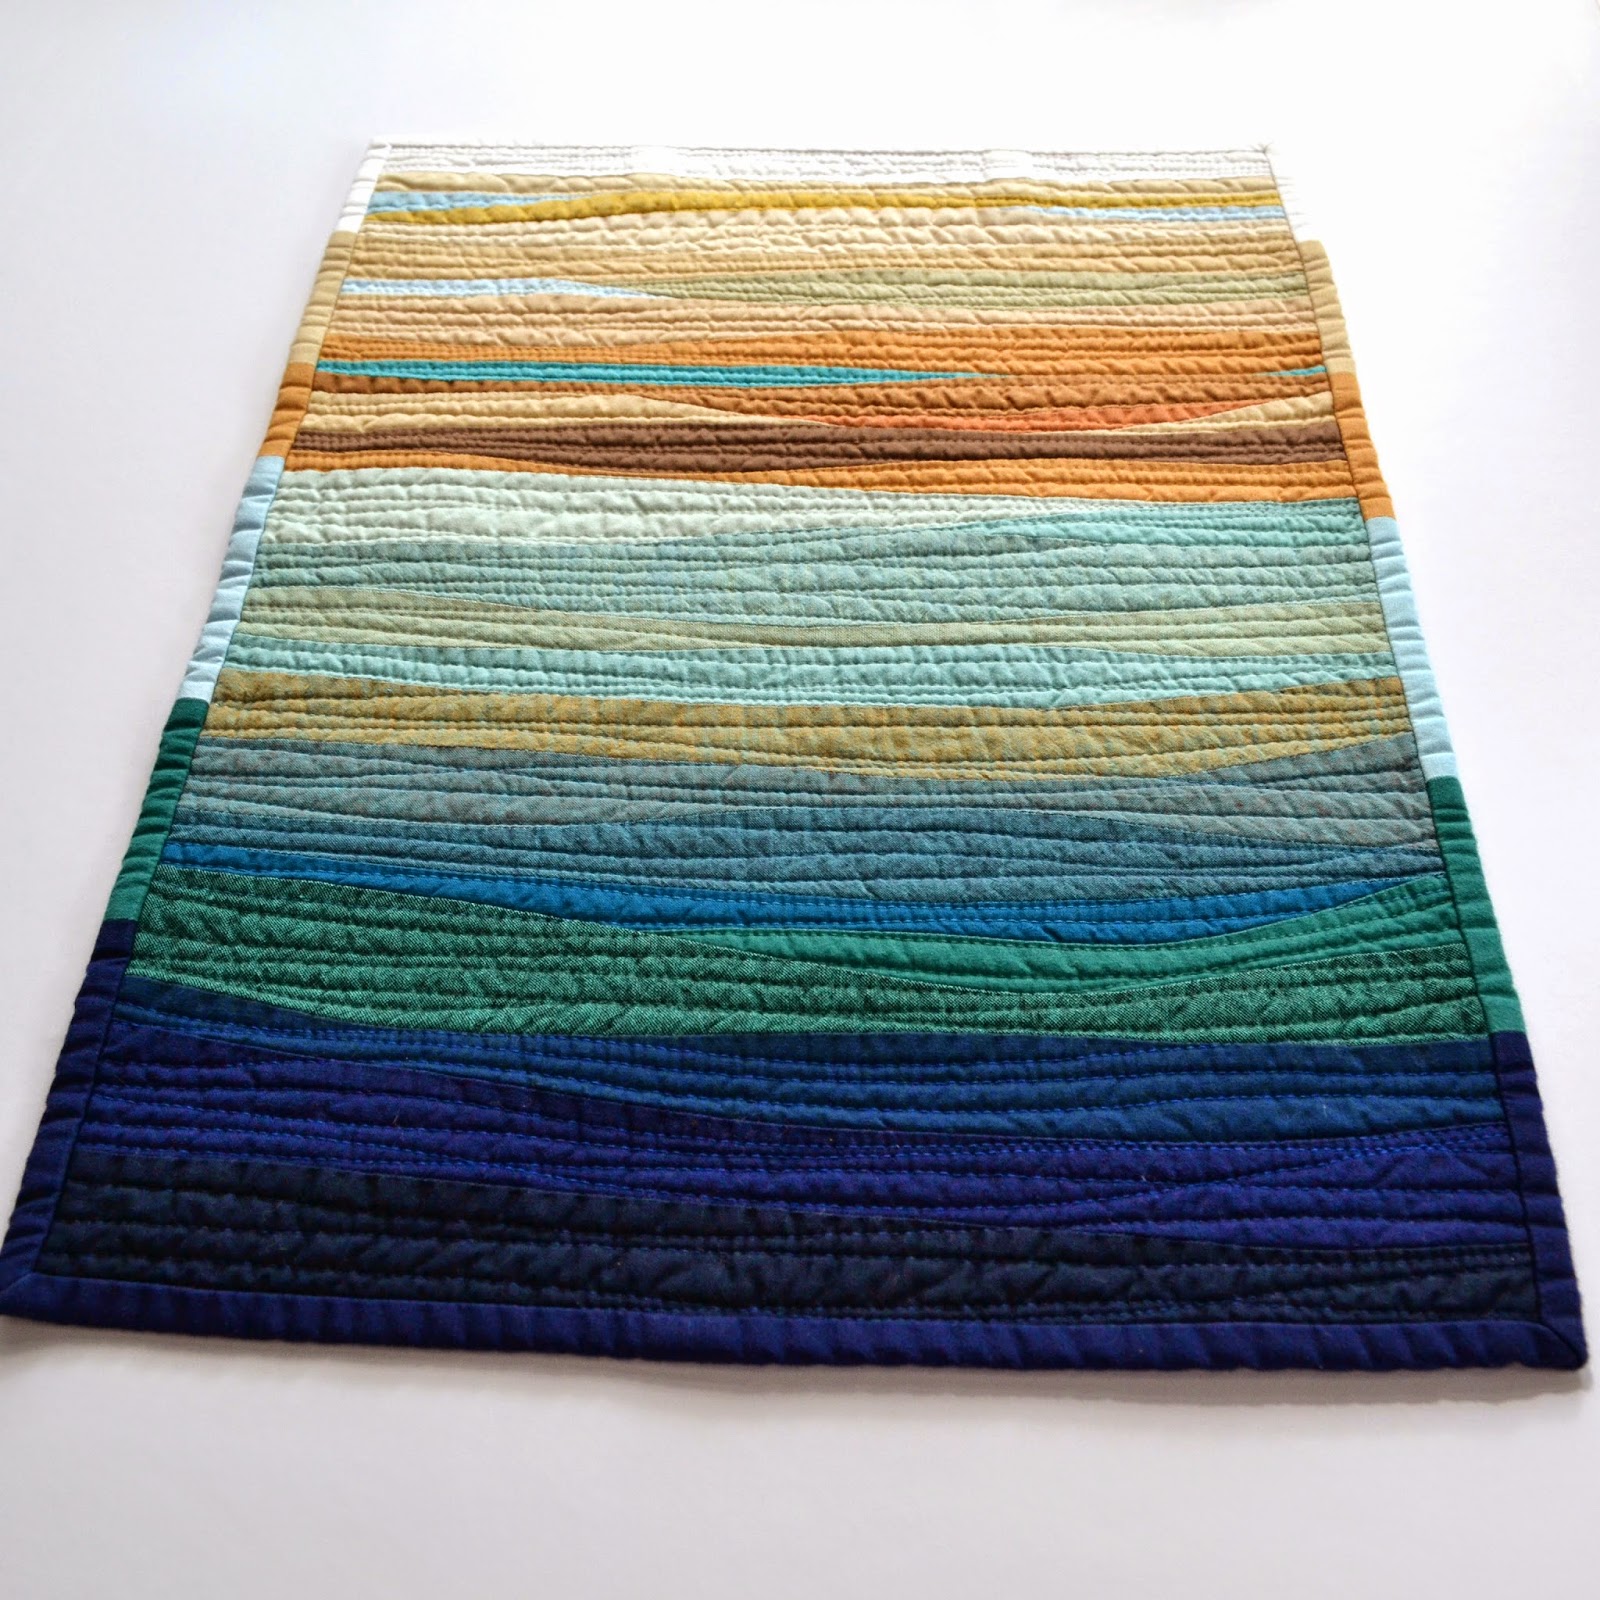
| Ebb & Flow 13 1/4" x 18" |
 |
| Motion of the Ocean 13 1/4" x 18" |
 |
| Modern Sunset 13 1/4" x 18" |
 |
| Sand & Sea 13 1/4" x 18" |
 |
| Motion of the Ocean 2 13 1/4" x 18" |

Each is equipped with a handy hanging rod. How do you hang your minis? I like this method, it's easy, clean and does the job!


I think I got sea sick during all the waves/curves! I have never made this many at one time before. Well worth it. There is one more on my horizon ~ Smoky Mountains!
LINKING:
Oh my those are gorgeous!! I love the colors together, you have a great eye for the color transitions. Just beautiful
ReplyDeleteIt really helps to have 30+ different shades to work with.
DeleteThose look really super! I like them lots.
ReplyDeleteI'm in love Jayne! They are like looking out at the sea during different times of the day and in its different moods. Your pieced bindings are the piece de résistance. How and where do you plan to dipsy these? Do you have any plans for showing them off at quilt shows?
ReplyDeleteWhat is the little stick that you use as a hanging rod? I like your mini hanging method.
"Display"... not "dipsy" LOL
DeleteI can't thank you enough for the wonderful compliments Lara! I just love making these!
DeleteI love these! Would you do a tutorial on them sometime?
ReplyDeleteI really need to do a more advanced curve tutorial and these would be perfect for that! My problem is explaining it so it makes sense! I'll see what I can do…stay tuned!
Deletedid you made a tutorial finally? I really want to try this!!!!!
Deleteyanicka diamonique01@gmail.com
I've been looking forward to seeing those bindings, and they were worth the wait. Do you have more detail about your hanging system? I see what you did in the corners, but what are the two brown straps, and how do you get it on the wall? Do you slide the wood slat over a nail?
ReplyDeleteIt's all very easy and works well for mini's. For these pieces I used 3 1/4" squares folded, the loops are 3" of twill tape or ribbon folded and the wood I get at Home Depot. Its 1/2" wide. My husband cuts it the size I need and drills the hole in the center. I add the ribbon/twill to keep the top of the piece straight and close to the wood. It really does work great! Hopefully the hole is big enough to easily slip over a small nail head!
DeleteThis is a really lovely series and definitely takes me to the sea. I would love to know more about your hanging technique as I'm making more minis these days.
ReplyDeleteThere are lots of different ways to hang mini's, but this is my very favorite!
DeleteReally, really amazing little wall hangings!!! Really inspiring!
ReplyDeleteGreetings, Rike
They all turned out fabulous! Love the red sunset one
ReplyDeletethe look fantastic, great colours that really give a feel of the sea. i think my favourite is modern sunset. I love how you did the binding, that is real attention to detail and I think it was worth the effort.
ReplyDeleteThese are truly stunning, Jayne! What a neat effect. I like seeing the progression. As for hanging the minis...I seem to do it differently every time.
ReplyDeleteJust beautiful! Love all your colors. Hope some tutorial follow soon? Thanks for sharing your beautiful works.
ReplyDeleteBeautiful - really atmospheric and evocative. They look great individually and stunning as a set - congratulations.
ReplyDeleteThese are beautiful! Nicely done
ReplyDeleteCan we be friends? I just saw your mini improv quilts and almost died because of how amazing and inspiring they are. Then I kept browsing and saw your encapsulate project. Seriously, your work is amazing and I want to be like you. :) Kristen
ReplyDeleteCan we be friends? I just saw your mini improv quilts and almost died because of how amazing and inspiring they are. Then I kept browsing and saw your encapsulate project. Seriously, your work is amazing and I want to be like you. :) Kristen
ReplyDeleteYou made my day Kristen! You can never have too many friends! Thank you so much for the kind and generous words! Tonight I will be finishing the binding on my 'Encapsulated' quilt…so excited to finish it! People like you make what I do so well worth it…when I doubt myself…I'm going to read your comments again!
DeleteThank you!
these are so beautiful! the colors are amazing. I could stare at them for hours!
ReplyDeleteThese are one of my favorite things to create…trying to get the colors just right is half the fun!
DeleteWhat a great wall of art. Making fabric move looks hard.
ReplyDeleteIf these minis were paintings, they'd be wonderful but as mini quilts they are even better! Great texture and I love the way you have hung them. Very impressive!
ReplyDeleteOh my goodness, they are stunning! Wonderful work with the colors, texture and your extra work on the binding was well worth it!
ReplyDeleteOh those bindings!! They really do complete the quilts. I like all of the quilts a lot, but my favorite is Sand & Sea because it reflects so well the feeling and colors of my beloved Lake Michigan. I usually make a sleeve for hanging, but I've done little triangles with a dowel a few times for small quilts. I'm intrigued by your use of the twill tape to keep the top straight.
ReplyDeleteGorgeous minis! The colors are fabulous. The red one really pops when displayed with the blue ones.
ReplyDeleteI really like them. It's a good idea for a workshop at my guild.
ReplyDeleteEvery single one of them is amazing!
ReplyDeleteThese. are. amazing. BEAUTIFUL job! You are so inspiring me!
ReplyDelete